

Introduction
The Per-App Language Preferences is one of the latest additions to Android 13. What does this mean? For instance, if the default language of your phone is English. You can set Hindi as a language for an app and Spanish as another. This saves the hassle of changing languages back and forth on your device.
Getting Started
For this tutorial, you will build a simple app that greets you in your language of choice. Here is a demo of the app
Setting Up The Project
There are two things to keep in mind to get this working:
- Your project has to compile with "android-Tiramisu" SDK.
- Your project should have AppCompat 1.6.0-alpha01 or higher.
implementation 'androidx.appcompat:appcompat:1.4.1'Here is what the build.gradle looks like
plugins {
    id 'com.android.application'
    id 'org.jetbrains.kotlin.android'
}

android {
    compileSdkPreview "Tiramisu"  // <------- IMPORTANT

    defaultConfig {
        applicationId "dev.droidchef.samples.languageselector"
        minSdkPreview "Tiramisu" // <------- IMPORTANT
        targetSdkPreview "Tiramisu" // <------- IMPORTANT
        versionCode 1
        versionName "1.0"

        testInstrumentationRunner "androidx.test.runner.AndroidJUnitRunner"
    }

    buildTypes {
        release {
            minifyEnabled false
            proguardFiles getDefaultProguardFile('proguard-android-optimize.txt'), 'proguard-rules.pro'
        }
    }
    compileOptions {
        sourceCompatibility JavaVersion.VERSION_1_8
        targetCompatibility JavaVersion.VERSION_1_8
    }
    kotlinOptions {
        jvmTarget = '1.8'
    }

    buildFeatures {
        viewBinding true
    }
}

dependencies {

    implementation 'androidx.core:core-ktx:1.7.0'
    implementation 'androidx.appcompat:appcompat:1.4.1' <------- IMPORTANT
    implementation 'com.google.android.material:material:1.5.0'
    implementation 'androidx.constraintlayout:constraintlayout:2.1.3'
    testImplementation 'junit:junit:4.13.2'
    androidTestImplementation 'androidx.test.ext:junit:1.1.3'
    androidTestImplementation 'androidx.test.espresso:espresso-core:3.4.0'
}
Ensure your project compiles after making the above changes.
Next, let's create a simple layout to show some text and change the language.
Creating a Multilingual Activity
Designing the Layout
As visible in the demo, the layout contains a TextView and a Spinner. The string that we translate across six languages will be visible in this TextView. The Spinner shows a list of languages your app supports.
Here is the layout file that you can copy
<?xml version="1.0" encoding="utf-8"?>
<androidx.constraintlayout.widget.ConstraintLayout xmlns:android="http://schemas.android.com/apk/res/android"
    xmlns:app="http://schemas.android.com/apk/res-auto"
    xmlns:tools="http://schemas.android.com/tools"
    android:layout_width="match_parent"
    android:layout_height="match_parent"
    tools:context=".MainActivity">

    <TextView
        android:id="@+id/tvGreeting"
        android:layout_width="wrap_content"
        android:layout_height="wrap_content"
        android:text="@string/greeting"
        app:layout_constraintBottom_toTopOf="@id/spLanguagePicker"
        app:layout_constraintEnd_toEndOf="parent"
        app:layout_constraintStart_toStartOf="parent"
        app:layout_constraintTop_toTopOf="parent" />

    <androidx.appcompat.widget.AppCompatSpinner
        android:layout_width="wrap_content"
        android:layout_height="wrap_content"
        android:id="@+id/spLanguagePicker"
        app:layout_constraintBottom_toBottomOf="parent"
        app:layout_constraintEnd_toEndOf="parent"
        app:layout_constraintStart_toStartOf="parent"
        app:layout_constraintTop_toBottomOf="@id/tvGreeting"
        android:entries="@array/languages"
        />

</androidx.constraintlayout.widget.ConstraintLayout>
Adding the Strings
After copying the file, your IDE might complain about missing string resources. So go ahead and copy this into your strings.xml file.
<resources>
    <string name="app_name" translatable="false">Language Selector</string>
    <string name="greeting">Hello, World!</string>
    <string-array name="languages">
        <item>Hindi</item>
        <item>Dutch</item>
        <item>Japanese</item>
        <item>English</item>
        <item>Spanish</item>
        <item>Italian</item>
        <item>French</item>
    </string-array>
</resources>
While we are at it, let us create different string resource files for each language.
This video shows you How To Localise Your Android App.
If you already know how to do it, go ahead and add translations for the following languages. ️
- Hindi 🇮🇳
- English 🇺🇸
- French 🇫🇷
- Italian 🇮🇹
- Spanish 🇪🇸
- Japanese 🇯🇵
If you don't want to spend time on Google Translate, I already have them for you here 👉 https://github.com/droidchef/android-per-app-language-preferences/tree/main/app/src/main/res
Wiring it all Together
Now that all the XML stuff is out of the way. It is time to write some Java Kotlin. Yes, I am that kind of a person. 😁
In your onCreate method of the Activity, set up the ViewBinding for your layout file.
class MainActivity : AppCompatActivity() {

    override fun onCreate(savedInstanceState: Bundle?) {
        super.onCreate(savedInstanceState)
        val binding = ActivityMainBinding.inflate(layoutInflater)
        val view = binding.root
        setContentView(view)
    }

}
Next, you will add a list of locales your app supports. Go ahead and add this in your Activity.
private val localeList = listOf("hi", "nl", "ja", "en", "es", "it", "fr")
After adding this, we can start reacting to the Spinner's item selection based on the item ID.
Now create an instance of onItemSelectedListener like this
    override fun onCreate(savedInstanceState: Bundle?) {
        super.onCreate(savedInstanceState)
        val binding = ActivityMainBinding.inflate(layoutInflater)
        val view = binding.root
        setContentView(view)
        binding.spLanguagePicker.onItemSelectedListener =
            object : AdapterView.OnItemSelectedListener {
                override fun onItemSelected(p0: AdapterView<*>?, p1: View?, p2: Int, p3: Long) {
                    println("Selected locale = ${localeList[p2]}")

                }

                override fun onNothingSelected(p0: AdapterView<*>?) {

                }
            }

    }
▶️ Now go ahead and run the app. Assuming the app compiles and runs. ✅
- You should be able to pick different languages with the Spinner dropdown.
- When you select a language, you should see an output in your Logcat that looks something like this
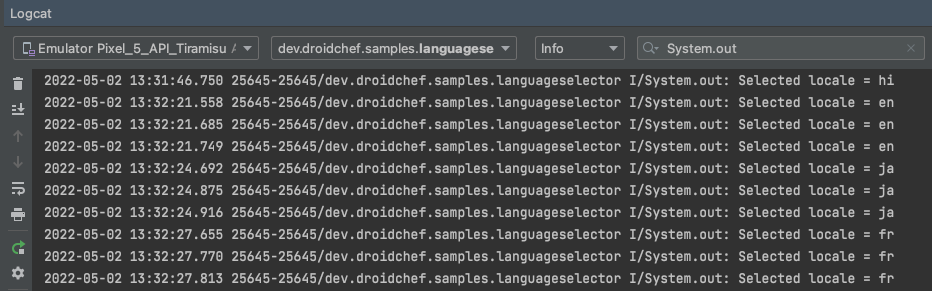
In the next section, we can add our logic to apply the selected language to our app. So that the app displays all the strings with their respective translations.
Switching the Language
To change the language you have to set a LocaleList on the LocaleManager instance. Go ahead and add this function to your Activity.
    private fun setAppLocale(locale: Locale) {
        val localeManager = getSystemService(LocaleManager::class.java)
        localeManager.applicationLocales = LocaleList(locale)
    }
In the above function we do the following:
- Get an instance of LocaleManager class.
- Set a
LocaleListto theapplicationLocalesofLocaleManager.
LocaleList is an immutable list of Locales, typically used to keep an ordered list of user preferences for locales.
– Source Android Documentation
Now you need to call this function and you're done! Go ahead and update the listener like this.
binding.spLanguagePicker.onItemSelectedListener =
            object : AdapterView.OnItemSelectedListener {
                override fun onItemSelected(p0: AdapterView<*>?, p1: View?, p2: Int, p3: Long) {
                    println("Selected locale = ${localeList[p2]}")
                    setAppLocale(Locale.forLanguageTag(localeList[p2])) // --> Add this line
                }

                override fun onNothingSelected(p0: AdapterView<*>?) {

                }
            }
Now, Run the app and try to change the language. As soon as you select another language, your app will restart on its own and with the applied changes.
Getting Current Language
It is possible to get the current preferred language for your app using the following lines of code:
        val localeManager = getSystemService(LocaleManager::class.java)
localeManager.applicationLocales = LocaleList(locale)Source Code
The full source code of the project is available here on this Github Repository.
Conclusion
This brings us to the end of the tutorial. Here you learned how to use the new per-app language preference introduced in Android 13.
Even though it doesn't help add any new functionality to your apps. It is good to see Google and the Android team helping make apps more accessible for their users.
It could prove to be beneficial for quality assurance or debugging tools that I plan to develop in the future.
Subscribe to my blog and never miss an update on new articles about Android and Gradle like my latest article on the impact of dependency tree depth on gradle builds and mastering the gradle dependency tree.


